Node.js Http模块
Http模块,主要的应用是两部分:
- http.createServer 担当web服务器
- http.createClient,担当客户端,实现爬虫之类的工作。
Http服务器
创建一个简单的http服务器
Nodejs官网中有给出以下示例代码:
const http = require('http')

const hostname = '127.0.0.1'
const port = 3000

const server = http.createServer((req, res) => {
  res.statusCode = 200
  res.setHeader('Content-Type', 'text/plain') //writeHead,200表示页面正常,text/plain表示是文字。
  res.end('Hello World\n') // end 完成写入
})

server.listen(port, hostname, () => {
  console.log(`服务器运行在 http://${hostname}:${port}`)
})
分析下代码:
- 首先, 通过
require('http')引入http模块. - 然后, 通过
http.createServer([requestListener])来创建一个web服务器,并传入一个可选的回调函数,回调函数有两个参数分别代表客户端请求对象request和服务器端的响应对象response. - 最后, 使用
server.listen([port][, hostname][, backlog][, callback]), 开始在指定的port和hostname上接受http请求并做出响应
通过以上3步, 即创建了一个简单的http服务器.
关闭服务器
如何关闭刚刚创建的http服务器呢?
// 停止服务端接收新的连接
server.close([callback])
超时设置
Node.js Http模块也提供了server.timeout用于查看或设置超时
server.timeout = 1000 //设置超时为1秒
console.log(server.timeout)
request对象
- request.url, 客户端请求的url地址
- request.headers, 客户端请求的http header
- request.method, 获取请求的方式,一般有几个选项,POST,GET和DELETE等,服务器可以根据客户端的不同请求方法进行不同的处理。
- request.httpVersion, http的版本
- request.trailers, 存放附加的一些http头信息
- request.socket, 用于监听客户端请求的socket对象
我们可以写段简单的js代码将客户端的请求信息记录下来. 创建一个名为: simpleHttpServer.js的文件, 内容可能如下:
const http = require('http')
const fs = require('fs')

const server = http.createServer((req, res) => {
  res.statusCode = 200
  res.setHeader('Content-Type', 'text/plain')
  if(req.url === '/'){
      let logfile = fs.createWriteStream('./log.txt')
      logfile.write(`请求方法:${req.method} \r\n`)
      logfile.write(`请求url:${req.url} \r\n`)
      logfile.write(`请求头对象:${JSON.stringify(req.headers, null, 4)} \r\n`)
      logfile.write(`请求http版本:${req.httpVersion} \r\n`)
  }
  res.end('Hello World\r\n')
})

server.listen(3000, '127.0.0.1', () => {
  console.log('服务器运行在 http://127.0.0.1:3000')
})
log.txt中的内容可能如下:
请求方法:GET
请求url:/
请求头对象:{
    "host": "localhost:3000",
    "connection": "keep-alive",
    "upgrade-insecure-requests": "1",
    "user-agent": "Mozilla/5.0 (Windows NT 6.1; Win64; x64) AppleWebKit/537.36 (KHTML, like Gecko) Chrome/74.0.3729.131 Safari/537.36",
    "accept": "text/html,application/xhtml+xml,application/xml;q=0.9,image/webp,image/apng,*/*;q=0.8,application/signed-exchange;v=b3",
    "accept-encoding": "gzip, deflate, br",
    "accept-language": "zh-CN,zh;q=0.9",
    "cookie": "Webstorm-ab681485=f7ada1cf-810b-404b-9211-5cd0460e5013; optimizelyEndUserId=oeu1506523580880r0.9072636112603187; _ga=GA1.1.744315833.1506431133"
}
请求http版本:1.1
response对象
- response.writeHead(statusCode, [reasonPhrase], [headers])
- response.statusCode, html页面状态值
- response.header, 返回的http header,可以是字符串,也可以是对象
- response.setTimeout(msecs, callback), 设置http超时返回的时间,一旦超过了设定时间,连接就会被丢弃
- response.statusCode, 设置返回的网页状态码
- response.setHeader(name, value), 设置http协议头
- response.headersSent, 判断是否设置了http的头
- response.write(chunk, [encoding]), 返回的网页数据,[encoding] 默认是 utf-8
- response.end([data], [encoding]), 响应结束
URL解析
在Node.js中,提供了一个url模块与querystring (查询字符串)模块
querystring模块 用于 URL 处理与解析
querystring.parse(str, [sep], [eq], [options])
例如:
querystring.parse('foo=bar&baz=qux&baz=quux&corge')
// returns
{ foo: 'bar', baz: ['qux', 'quux'], corge: '' }
querystring.stringify(obj,separator,eq,options)
这个方法是将一个对象序列化成一个字符串,与querystring.parse相对。 例如:
querystring.stringify({name: 'whitemu', sex: [ 'man', 'women' ] });

// returns
'name=whitemu&sex=man&sex=women'
URL构成
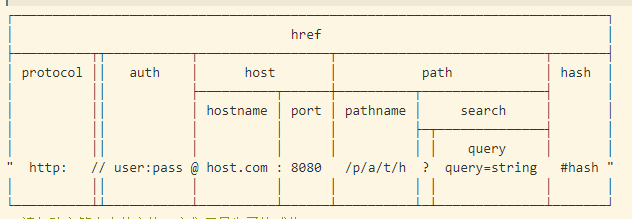
url 模块提供了一些实用函数,用于 URL 处理与解析 一个 URL 字符串是一个结构化的字符串,它包含多个有意义的组成部分。 当被解析时,会返回一个 URL 对象,它包含每个组成部分作为属性。
以下详情描述了一个解析后的 URL 的每个组成部分
- url.format(urlObject) 会一个从 urlObject 格式化后的 URL 字符串
- url.parse(urlString[, parseQueryString[, slashesDenoteHost]]), 解析一个 URL 字符串并返回一个 URL 对象
我们可以使用url.parse()解析出的对象来获取URL中的各个值
更多请参考Nodejs中文官网
构建一个简单的HTTP JSON API Server
编写一个 HTTP 服务器,每当接收到一个路径为 '/api/parsetime' 的 GET 请求的时候,响应一些 JSON 数据。 我们期望请求会包含一个查询参数(query string),key 是 "iso",值是 ISO 格式的时间。
- url:
/api/parsetime?iso=2017-04-05T12:10:15.474Z
所响应的 JSON 应该只包含三个属性:'hour','minute' 和 'second'。例如:
{
  "hour":21,
  "minute":45,
  "second":30
}
- url:
/api/unixtime?iso=2017-04-05T12:10:15.474Z,它的返回会包含一个属性:'unixtime',相应值是一个 UNIX时间戳。例如:
{ "unixtime": 1376136615474 }
实际代码可能如下:
const http = require('http')
const url = require('url')

const hostname = '127.0.0.1'
const port = 3000

/**
 * @desc: 解析时间
 * @param {Object} time, 日期对象
 * @return {Object}
 */
function parsetime(time) {
    return {
        hour: time.getHours(),
        minute: time.getMinutes(),
        second: time.getSeconds()
    }
}

/**
 * @desc: unix时间
 * @return {Object}
 */
function unixtime(time) {
    return { unixtime: time.getTime() }
}

const server = http.createServer((req, res) => {
    let parsedUrl = url.parse(req.url, true)
    let time = new Date(parsedUrl.query.iso)
    let result
	  // 首页, 返回当前时间的json
    if(req.url=='/'){
        result = parsetime(new Date())
    }
    // 返回查询时间的json
    else if (/^\/api\/parsetime/.test(req.url)) {
        result = parsetime(time)
    }
    // 返回查询时间的unixtime
    else if (/^\/api\/unixtime/.test(req.url)) {
        result = unixtime(time)
    }

    if (result) {
        res.writeHead(200, { 'Content-Type': 'application/json' })
        res.end(JSON.stringify(result))
    } else {
        res.writeHead(404)
        res.end()
    }
})

server.listen(port, hostname, () => {
    console.log(`服务器运行在 http://${hostname}:${port}`)
})
Http客户端
在Node.js可以很容易的使用request方法想向其他网站求数据,也可以用http.get(options[, callback])
http.request(options, callback)
request方法的options参数,可以是一个对象,也可以是一个字符串。如果是字符串,就表示这是一个URL,Node内部就会自动调用url.parse(),处理这个参数。
http.request()返回一个http.ClientRequest类的实例。它是一个可写数据流,如果你想通过POST方法发送一个文件,可以将文件写入这个ClientRequest对象
现在我们拿www.github.com试试
const http = require('http')
let options = {
    hostname: 'www.example.com',
    port: 80,
    path: '/',
    method: 'GET'
}

const req = http.request(options, (res) => {
    console.log(`STATUS: ${res.statusCode}`) //返回状态码
    console.log(`HEADERS: ${JSON.stringify(res.headers, null, 4)}`) // 返回头部
    res.setEncoding('utf8') // 设置编码
    res.on('data', (chunk) => { //监听 'data' 事件
        console.log(`主体: ${chunk}`)
    })

})
req.end() // end方法结束请求
到此我们请求到了网站上的信息,基于这些我们可以开发出更有用的爬虫,提取到有用的信息,感兴趣的话, 也可以深入学习下.