Koa Cookie & Session
Koa Cookie
koa提供了从上下文直接读取、写入cookie的方法
- ctx.cookies.get(name, [options]), 读取上下文请求中的cookie
- ctx.cookies.set(name, value, [options]), 在上下文中写入cookie koa 中操作的cookies是使用了npm的cookies github模块,所以在读写cookie的使用参数与该模块的使用一致。
代码示例
const Koa = require('koa')
const app = new Koa()

app.use( async ( ctx ) => {
  if ( ctx.url === '/hello' ) {
    ctx.cookies.set(
      'cid',
      'hello james',
      {
        domain: '127.0.0.1',              // cookie所在的domain(域名)
        path: '/hello',                   // cookie所在的path(路径)
        maxAge: 1 * 60 * 60 * 1000,       // cookie的有效时长, 这里为1小时
        expires: new Date('2019-07-02'),  // cookie的失效时间
        httpOnly: false,                  // 是否只用于http请求中获取
        overwrite: false                  // 是否允许重写
      }
    )
    ctx.body = 'cookie has set ok'
  } else {
    ctx.body = 'hello world'
  }

})


app.listen(3000, () => {
  console.log('服务器运行在 http://127.0.0.1:3000')
})
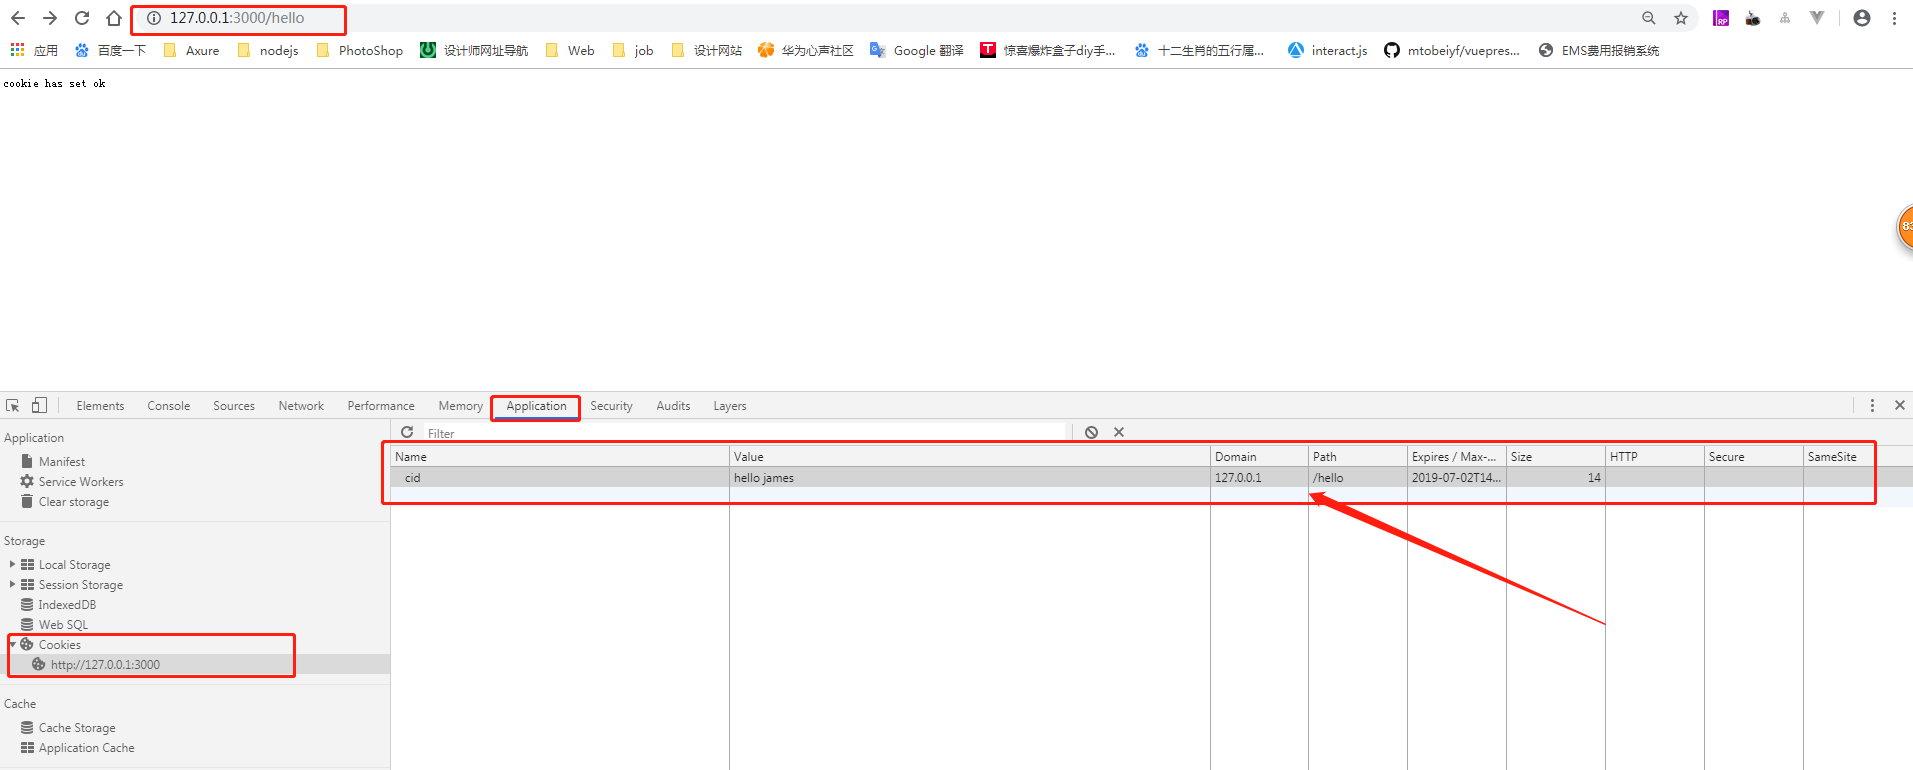
如上代码所示, 若访问路径: http://127.0.0.1:3000/hello, 即会给浏览器写入cookie. 最终结果如下图所示:
中间件 koa-cookie
在开源并封装好的koa-cookie, 安装和使用也很简单.
安装 koa-cookie:
npm install koa-cookie
或者
yarn add koa-cookie
示例代码(不使用koa-router)
import Koa from 'koa';
import cookie from 'koa-cookie';

const app = Koa();
app.use(cookie());

app.use(async function (ctx, next) {
  const cookies = ctx.cookie;
  /*
    if cookies sent are of the form: 'name=abc; age=20; token = xyz;'
    Then ctx.cookie is an object of the form:
    {
      name: 'abc',
      age: '20',
      token: 'xyz'
    }
  */
});
示例代码(使用koa-router)
var app = require('koa')();
var cookie = require('koa-cookie');
var router = require('koa-router')();

router.use(cookie.default());

router.get('/', async (context) => {
  const cookies = context.cookie;
  /*
    if cookies sent are of the form: 'name=abc; age=20; token = xyz;'
    Then ctx.cookie is an object of the form:
    {
      name: 'abc',
      age: '20',
      token: 'xyz'
    }
  */
});

app
  .use(router.routes())
  .use(router.allowedMethods());
Koa Session
koa原生功能只提供了cookie的操作,但是没有提供session操作。session就只用自己实现或者通过第三方中间件实现。 Session实现的常见方案可能有:
- 存储在内存中
- 存储在数据库中, 如Mysql, mongodb, 或者内存数据库中(如: Redis, memcached等)
session存储在MongoDB中
将session存储在mongodb中, 需要使用到中间件: koa-session, 提供存储介质的读写接口.
实现思路:
- 将sessionId和对于的数据存到数据库
- 将数据库的存储的sessionId存到页面的cookie中
- 根据cookie的sessionId去获取对于的session信息
安装 koa-session
安装:
npm install koa-session
或者
yarn add koa-session
完整示例代码:
index.js
const Koa = require('koa');
const Router = require('koa-router');
const mongoose = require('mongoose')
const session = require('koa-session');
const SessionStore = require('./sessionStore.js'); // 完整代码在下面会提供出

const db = mongoose.connect("mongodb://localhost/james", { useNewUrlParser: true } )


var app = new Koa();
// 使用路由
var router = new Router();

// 密钥字符串
app.keys = ['some secret string'];
// session 配置信息
const CONFIG = {
  key: 'koa:sess',
  maxAge: 24 * 60 * 60 * 1000,
  overwrite: true,
  httpOnly: true,
  signed: true,
  rolling: false,
  autoCommit: true, // 自动提交
  store: new SessionStore({
      collection: 'sessions',       //数据库集合
      connection: db,         // 数据库链接实例
      expires: 24 * 60 * 60,        // 默认时间为1天
      name: 'session'               // 保存session的表名称
  }),
  renew: false, // 默认为false, 当用户session快过期时, 是否自动续期
};

// 以中间件的方式使用session
app.use(session(CONFIG, app));

router.get('/', async (ctx, next) => {
  // 获取session对象
  const session = ctx.session;

  // 给session赋值
  session.userInfo = {
      name:'james',
      email:'hellojameszhang@163.com',
      age : 31
  }
  ctx.body = 'hello world'
  next()
})

app
  .use(router.routes())
  .use(router.allowedMethods());
app.listen(3000)
sessionStore可根据自己的需要自行实现, 实现在的相关规范可参考koa-session
sessionStore.js
const mongoose = require('mongoose')
const schema = {
  _id: String,
  data: Object,
  updatedAt: {
      default: new Date(),
      expires: 24 * 60 * 60, // 1 day
      type: Date
  }
};
class MongooseStore {
  constructor ({
      collection = 'sessions',
      connection = null,
      expires = 86400,
      name = 'Session'
      } = {}) {
          if (!connection) {
          throw new Error('params connection is not collection');
          }
      const updatedAt = { ...schema.updatedAt, expires };
      this.session = mongoose.model(name, new mongoose.Schema({ ...schema, updatedAt }));

  }
  async destroy (id) {
      const { session } = this;
      return session.remove({ _id: id });
  }

  async get (id) {
      const { session } = this;
      const { data } = await session.findById(id);
      return data;
  }

  async set (id, data, maxAge, { changed, rolling }) {
      if (changed || rolling) {
      const { session } = this;
      const record = { _id: id, data, updatedAt: new Date() };
      await session.findByIdAndUpdate(id, record, { upsert: true, safe: true, useFindAndModify: false });
      }
      return data;
  }

  static create (opts) {
      return new MongooseStore(opts);
  }
}

module.exports = MongooseStore
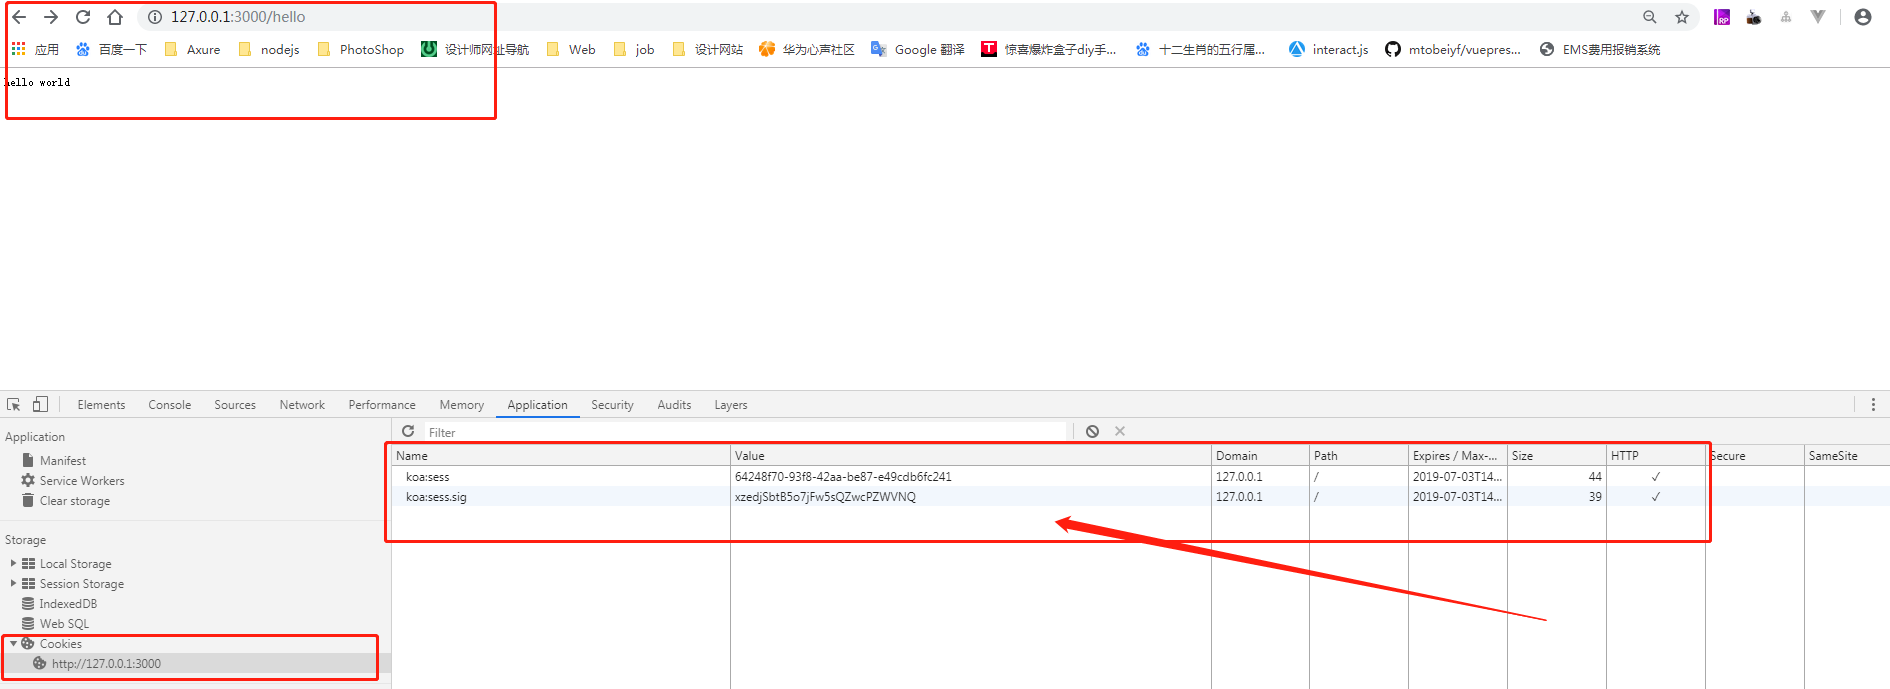
至此, 已简单实现koa session保存到mongodb. 访问: http://127.0.0.1:3000/, 查看cookie, 最终结果可能如下:
查看mongodb数据库中的集合sessions, 即可发现数据已保存到mongodb中.
> use james
switched to db james
> show collections
hellos
sessions
users
> db.sessions.find()
{ "_id" : "8b5de860-432b-4798-bff6-ae3af53163c6", "__v" : 0, "data" : { "userInf
o" : { "name" : "james", "email" : "hellojameszhang@163.com", "age" : 31 }, "_ex
pire" : 1562164691767, "_maxAge" : 86400000 }, "updatedAt" : ISODate("2019-07-02
T14:38:11.768Z") }
{ "_id" : "24f2f586-65c3-4d40-92eb-b2dfd6c85c0e", "__v" : 0, "data" : { "userInf
o" : { "name" : "james", "email" : "hellojameszhang@163.com", "age" : 31 }, "_ex
pire" : 1562164706024, "_maxAge" : 86400000 }, "updatedAt" : ISODate("2019-07-02
T14:38:26.024Z") }
{ "_id" : "64248f70-93f8-42aa-be87-e49cdb6fc241", "__v" : 0, "data" : { "userInf
o" : { "name" : "james", "email" : "hellojameszhang@163.com", "age" : 31 }, "_ex
pire" : 1562164797496, "_maxAge" : 86400000 }, "updatedAt" : ISODate("2019-07-02
T14:39:57.496Z") }
>
相关链接
← Koa-static中间件 模板引擎 →